How to Use and Calibrate Your LCI Electric Leveling System
A reliable leveling system turns campsite setup from a chore into a quick, effortless step and the Lippert Components (LCI) electric leveling system is one of the most popular and user-friendly options found on thousands of towable RVs, including travel trailers, fifth wheels, toy haulers, and destination trailers from brands like Forest River, Keystone, Jayco, Grand Design, and Heartland. Whether your RV uses the classic rectangular LED keypad, the newer touchscreen versions, or the Bluetooth-enabled OneControl app, understanding how to operate it correctly saves time, prevents frustrating “out of stroke” errors, avoids uneven leveling, and protects the jacks from unnecessary strain.
In this comprehensive guide, we’ll cover everything: system overview, step-by-step auto and manual leveling, hitch height memory, retract functions, zero point calibration, Bluetooth app setup, common error messages, preventive maintenance, troubleshooting tips, upgrade considerations for 2026, and expanded FAQs based on real owner experiences. Proper use and occasional recalibration ensure your RV sits stable and level every trip, no matter the terrain.
At Great American RV SuperStores, we walk owners through LCI systems daily during deliveries and service visits. Many “failures” are simple user errors or low battery voltage issues easily fixed with the right knowledge.
Hey Happy Campers! Todd here with Great American RV SuperStores.
Today we’re diving deep into how to use, operate, and calibrate your LCI Electric Leveling System from powering on the keypad to mastering auto level, manual adjustments, hitch height recall, Bluetooth control via the Lippert OneControl app, recalibrating zero point, avoiding common errors like “out of stroke,” basic jack maintenance, troubleshooting, and answers to the questions we hear most often from owners.
If you’d prefer a step-by-step visual demo, check out the full walkthrough on the Great American RV YouTube channel in our Hap’s Helpful Hacks playlist.
Let’s level up your setup game!
System Overview: What Your LCI Keypad Tells You
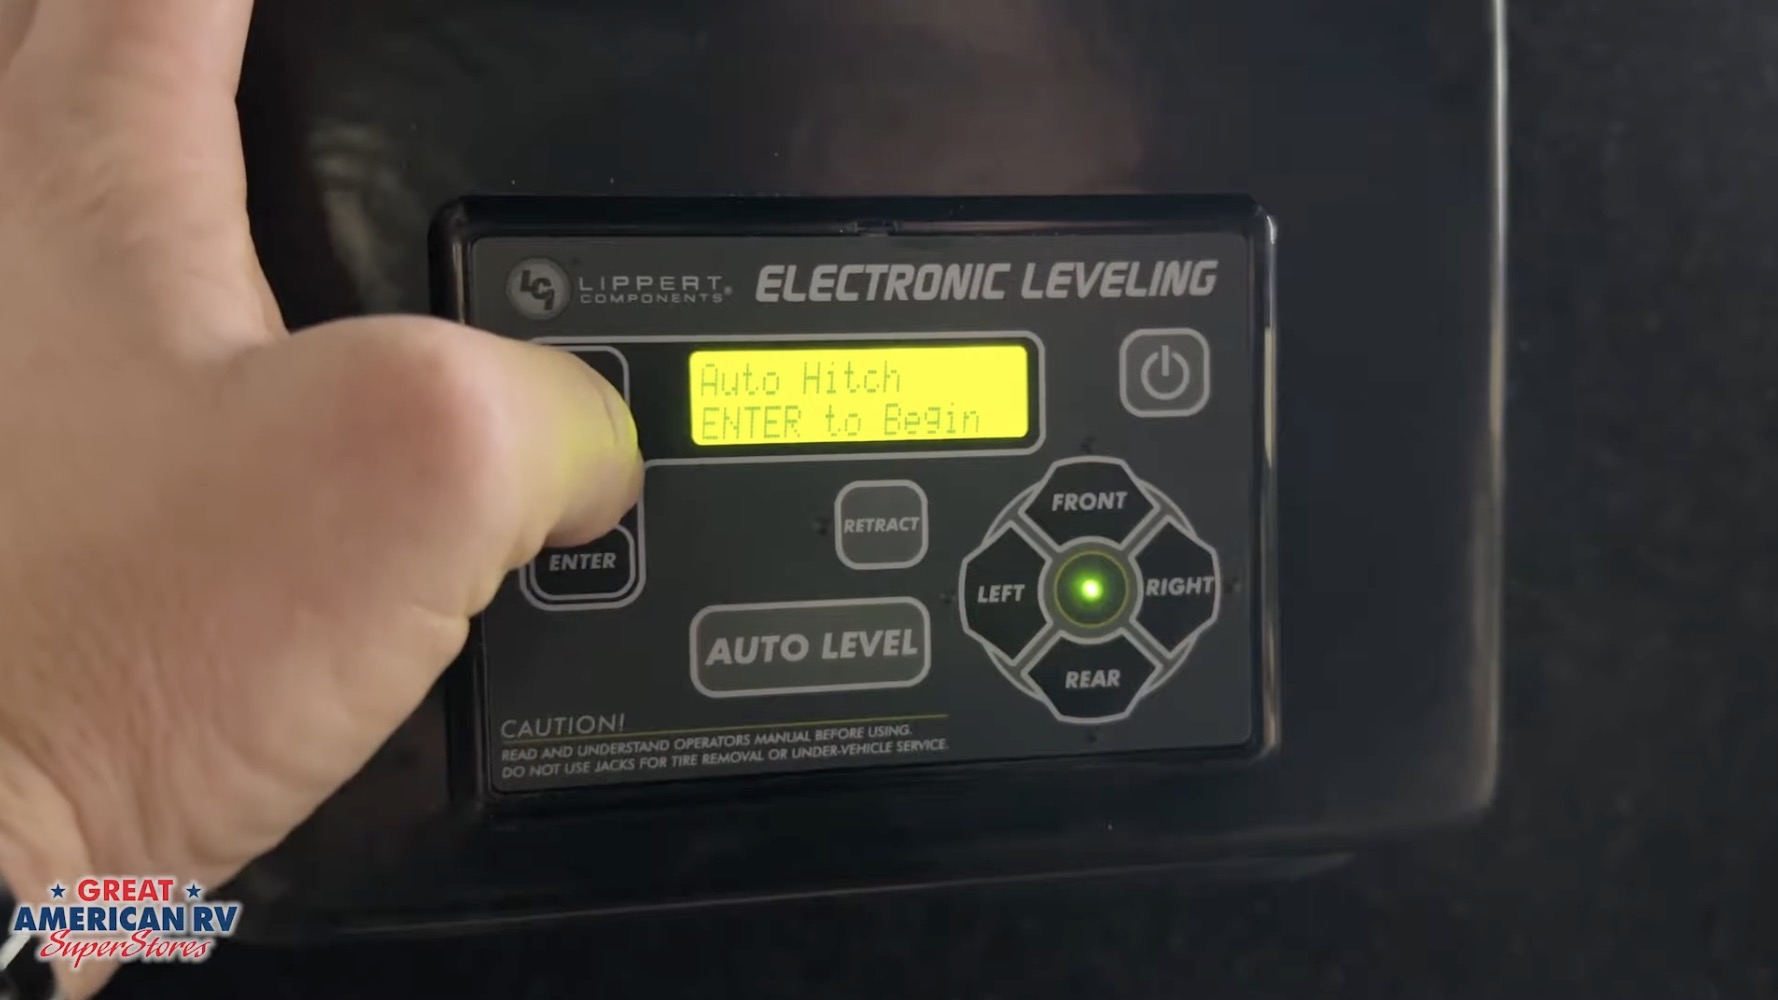
When you power on the LCI control panel (usually near the entry door or kitchen area), the rectangular LED screen displays:
- Battery Voltage Top line shows current house battery voltage (aim for 12.6V+ resting, 13.5–14.4V charging).
- Main Menu Options Auto Level, Manual Level, Auto Hitch Height, Auto Retract All, Auto Retract Rear, Front/Rear controls.
- Corner Indicators Orange LEDs show which corner(s) are low during manual leveling.
- Green Center Light Illuminates when the RV is level.
- Jack Stroke Display LF (left front), RF (right front), LR (left rear), RR (right rear) shows extension percentage or inches.
The system uses electric motors on each jack (front landing gear + rear stabilizer jacks) controlled by a central brain (the “Ground Control” or “Level Up” module). It relies on a solid 12-volt supply and an internal sensor for pitch/roll detection. In 2026 models, many include enhanced sensors for faster, more accurate leveling and better Bluetooth integration.
Auto Hitch Height: Remembering Your Disconnect Point
One of the most time-saving features:
- After arriving and leveling, note the jack stroke readings (e.g., LF 45%, RF 48%, etc.).
- When packing up, press Auto Hitch Height → Enter.
- The system automatically extends/retracts jacks to return to that exact height, making reconnection to your tow vehicle quick and aligned.
Tip: Use this after every level session it “remembers” your hitch height so you don’t guess next time. On fifth wheels, this is especially helpful for kingpin alignment.
Auto Retract Functions: Packing Up Safely
- Auto Retract All Retracts all jacks simultaneously. Before using, ensure fifth-wheel hitch is securely locked and kingpin fully engaged (or travel trailer coupler locked). Once you pull away, trailer weight shifts to the hitch.
- Auto Retract Rear Lifts only rear stabilizers, leaving front landing gear down useful for minor repositioning or if you want to keep front weight on blocks.
Always watch jacks retract fully; listen for motor shut-off. If jacks hang up, check for debris or low voltage.
Using Auto Level: The Easiest Way to Get Stable
Standard sequence after disconnecting from tow vehicle:
- Stabilize Front Use Front button to raise landing gear until RV is roughly level front-to-back and weight is off the hitch. Pull tow vehicle away.
- Press Auto Level → Confirm (usually hit Enter or Yes).
- Step Away Do not walk inside, open doors, extend slides, or bounce the RV while leveling. Movement confuses the sensor and causes inaccurate leveling or “out of stroke” errors.
- Wait System scans pitch/roll, then extends/retracts jacks individually. Takes 1–4 minutes.
- Completion Display shows “Leveling Complete” or green light; jacks stop. Now safe to enter, deploy slides, and enjoy camp.
Pro tip: On uneven sites, place blocks under low-side jacks first to give more stroke range and avoid “out of stroke” messages. Always level before extending slides weight shift can throw off the process.
Manual Leveling: When You Want Full Control
For fine-tuning or if auto fails:
- Press Manual Level → Enter.
- Screen shows degree marks (pitch/roll); goal is zero.
- Watch orange corner LEDs blinking indicates low corner/side. Raise low side/corner with corresponding button. Lights extinguish as that corner rises.
- Green center light illuminates when level.
- Retract manually: Hold Retract until red light appears, then use directional buttons. Hold Retract again to exit mode.
Use manual mode to tweak after auto level if needed, especially on sloped sites where auto might over-extend one jack.
Monitoring Jack Stroke & Avoiding “Out of Stroke” Errors
Keypad displays stroke % or inches for each jack:
- Out of Stroke Jack reached max extension without leveling. Fix: Add blocks under low jacks, recalibrate zero point, or move to flatter spot. Always leave 5–6 inches of jack tube visible on landing gear when extended gives travel range.
Recalibrating the Zero Point (Most Important Step)
If leveling drifts, feels off, or errors persist, reset zero point:
- Turn system off.
- Press and hold Front + Rear together 10 times quickly.
- Enter Zero Point Calibration mode.
- Place 4-ft level inside RV (floor or countertop).
- Manually level left-right and front-back using buttons.
- Once perfect (bubble centered), press Enter.
- System runs stability check, beeps, displays success.
Recalibrate after battery replacement, major moves, or if sensor seems inaccurate. Frequent need may indicate loose sensor service check recommended.
Bluetooth Control with Lippert OneControl App
Most 2025–2026 LCI systems include Bluetooth:
- Find QR code/password on keypad front or inside front compartment (near control module).
- Download Lippert OneControl app (iOS/Android).
- Enter VIN, device name, password.
- Connect via Bluetooth.
- Control Auto Level, Manual adjustments, Retract, Hitch Height from phone great for outside monitoring or fine-tuning without entering the RV.
App also shows jack stroke, voltage, and error codes.
Maintenance Tips to Keep Your LCI System Reliable
- Battery Health 12.6V+ resting; low voltage causes most errors/false faults. Use maintainer in storage.
- Jack Care Keep exposed tubes clean; apply silicone spray (not grease) seasonally to prevent corrosion and sticking.
- Fuses Check 30A main fuse on control board; carry spares.
- Operation Habits Retract fully after use; avoid leveling on extreme slopes without blocks.
- Annual Inspection Check wiring, sensor mounting, jack boots for tears; lubricate pivot points lightly.
Common Errors & Quick Fixes
- “Out of Stroke” Add blocks, recalibrate, or relocate.
- “Low Voltage” Charge batteries; check converter output (13.5–14.4V).
- “No Communication” Loose wiring, blown fuse, bad control board.
- “Jack Timeout” or “Motor Fault” Overheat let cool, check voltage.
- Uneven Level After Auto Recalibrate zero point; ensure no movement during process.
Upgrades & Alternatives for 2026
Newer LCI systems add auto-retract on hitch connection, improved sensors, and better app integration. Some owners add aftermarket stabilizers or switch to hydraulic for heavier rigs.
Expanded Frequently Asked Questions
How long does Auto Level take? 1–4 minutes depending on starting position and terrain.
Why does my RV level but feel sloped inside? Sensor may need recalibration; use 4-ft level to verify and reset zero point.
Can I level with slides out? No retract slides first; weight shift affects accuracy.
What if Auto Level fails repeatedly? Check voltage, fuses, recalibrate zero point; may need sensor or board service.
Is Bluetooth reliable? Yes, in 2026 models; keep phone close, update app.
How many jacks on my system? Typically 4 (2 front landing, 2 rear stabilizers); some have 6.
Do I need blocks on flat sites? Not always, but helpful for extra stroke on slight inclines.
Can I use manual mode after auto? Yes fine-tune corners as needed.
Best way to store the RV? Fully retract jacks, use battery disconnect, maintain charge.
Motor replacement cost? $300–$600 per jack + labor; recalibration often fixes “issues.”
Why does the keypad show low voltage even when plugged in? Bad converter output, loose wiring, or corroded connections test at batteries.
Can I override jacks manually if power fails? Some models have crank access; check manual or service for specifics.
How do I reset the system completely? Power off, disconnect battery for 5 minutes, reconnect, recalibrate.
Is the app free? Yes Lippert OneControl is free; no subscription.
What if jacks won’t retract after leveling? Check retract fuse, voltage, or stuck jack (clean/lube); manual retract if needed.
The Bottom Line
The LCI electric leveling system makes setup fast and stable when used correctly: charge batteries, check voltage, use Auto Level without moving inside, recalibrate zero point as needed, and maintain jacks. Avoid common pitfalls like low power or interrupting auto cycle, and your RV will sit level every time.
By mastering these steps:
- Start with battery checks and Auto Hitch Height/Auto Level.
- Recalibrate zero point for accuracy.
- Use Bluetooth for convenience.
- Maintain voltage and jacks regularly.
You’ll level faster, error-free, and spend more time relaxing at camp.
Watch the Full Video Walkthrough See everything demonstrated step-by-step in our How to Use and Calibrate Your LCI Electric Leveling System video from the service team. Find it on the Great American RV SuperStores YouTube channel in the Hap’s Helpful Hacks playlist.
At Great American RV SuperStores, we don’t just sell RVs we help you understand how to use them. We’re making memories one weekend at a time. 🚐
*This content is not a legal standard or regulation, and does not create any new legal obligation. It is advisory in nature, informational in content, and is intended to assist and educate consumers in the use and enjoyment of their recreational vehicles. Great American RV SuperStores does not hereby make any warranty, express or implied, and does not assume any liability with respect to the use of, or damages resulting from the use of any information, method or process included in this content.
Recent Comments