Understanding CO Detectors in Your RV and Why They Matter
Carbon monoxide (CO) detectors are one of the most important — and often most overlooked — safety devices in any RV. Unlike smoke detectors that warn of visible fire or burning, CO detectors silently monitor for an invisible, odorless, colorless gas that can build up quickly and become deadly within minutes. In an RV environment, where propane appliances (furnace, water heater, stove, oven, refrigerator in gas mode) are common and enclosed spaces are small, the risk of CO accumulation is higher than in a typical home. A properly functioning CO detector can literally save lives by sounding an alarm long before symptoms (headache, dizziness, nausea, confusion, unconsciousness) appear.
In 2026, CO detectors are standard equipment on virtually every new RV — towable (travel trailers, fifth wheels, toy haulers) and motorized (Class A, B, C motorhomes) — and are required by RVIA standards and many state/provincial regulations. Modern units are 12-volt hardwired, often interconnected (one alarm triggers all), and include digital displays, longer sensor life (7–10 years), and end-of-life warnings. This comprehensive guide explains everything you need to know: how CO forms in RVs, why detectors are mounted low, where to find them, how to test them properly, understanding expiration dates and end-of-life beeping, replacement step-by-step, common false alarms and real emergencies, integration with propane leak detectors, maintenance best practices, off-grid reliability, what to do if an alarm sounds, adding detectors to older RVs, battery backup considerations, and an expanded FAQ section based on real owner experiences and service feedback in 2026. Knowing your CO detectors inside and out gives you peace of mind and keeps every trip safe.
At Great American RV SuperStores, we emphasize CO safety during every delivery and PDI. We test detectors, explain replacement schedules, and often replace expired units before owners even leave the lot. The most common issues we see are detectors past their expiration date still in use, false alarms from low batteries or dust, or owners not knowing how to silence end-of-life chirps. With proper knowledge, these are easy to prevent.
Hey Happy Campers! Todd here with Great American RV SuperStores.
Today we’re taking a deep dive into CO detectors in your RV — why they’re essential, how they detect carbon monoxide, where they’re located and why low mounting matters, how to test them correctly, understanding expiration dates and end-of-life warnings, step-by-step replacement, what different alarm patterns mean, distinguishing false alarms from real emergencies, integrating with propane leak detectors, maintenance and cleaning tips, off-grid reliability, adding detectors to older RVs, battery backup considerations, and answers to the questions we hear most often from owners in 2026.
If you’d prefer a step-by-step visual demo, check out the full walkthrough on the Great American RV YouTube channel in our Hap’s Helpful Hacks playlist.
Let’s make sure your CO detectors are always ready to protect you and your family.
How Carbon Monoxide Forms in RVs and Why Detectors Are Critical
Carbon monoxide is produced whenever any fuel (propane, gasoline, diesel) burns incompletely. In an RV, the most common sources are:
- Furnace — Especially if the exhaust is blocked, restricted, or leaking.
- Water heater — Improper venting or burner issues.
- Stove/oven — Used for heating the RV (never safe).
- Refrigerator (gas mode) — Poor ventilation or burner problems.
- Generator — Exhaust too close to windows/vents.
- Engine exhaust — From tow vehicle or generator idling nearby.
CO is dangerous because it’s colorless, odorless, and tasteless — you can’t smell it like propane. It binds to hemoglobin in your blood 200 times more strongly than oxygen, starving your body of oxygen. Symptoms start mild (headache, fatigue) and progress rapidly to unconsciousness and death. In enclosed RV spaces, levels can rise to lethal concentrations in minutes.
CO detectors are electronic sensors (electrochemical or biomimetic) that measure CO concentration in parts per million (ppm). They alarm at specific thresholds (usually 70 ppm over 60–240 minutes, or 150–400 ppm faster) to give you time to ventilate and evacuate. Unlike home detectors (often battery-only), RV CO detectors are hardwired to 12V DC so they stay active whenever the house batteries are connected — even off-grid or in storage.
Where CO Detectors Are Located and Why Low Mounting Matters
RV manufacturers install CO detectors low on the wall, typically 12–36 inches from the floor. This is intentional and based on safety standards (RVIA and UL 2034):
- CO mixes evenly with air over time, but in the first minutes of a leak, it may be slightly heavier than air (molecular weight close to air but can pool low initially).
- Low placement puts the detector in the breathing zone for sleeping occupants (most CO deaths occur during sleep).
- Ensures early detection before CO rises to ceiling level.
- Avoids interference from cooking vapors or aerosols that rise.
Common locations:
- Near sleeping areas (bedroom walls).
- In main living area (near furnace or appliances).
- Often interconnected — one alarm triggers all units.
Some RVs have dual-function CO/propane detectors (one sensor for both gases), usually mounted low for propane (heavier) and mid-level for CO.
How to Test a CO Detector Properly
Testing is quick and should be done monthly — or every trip — to confirm the detector can still sense CO and sound the alarm.
Standard test procedure:
- Press and hold the Test button on the front of the unit (usually 3–5 seconds).
- The alarm should sound loudly (85+ dB) and may flash lights or show “Test Passed.”
- Release button — alarm stops.
- If no alarm: Check power (12V connected), replace batteries if equipped, or replace unit if hardwired and powered.
Some models have voice alerts (“Test Passed” or “Replace Detector”) or digital displays showing test results. Always test after storage or power interruptions.
Understanding Expiration Dates and End-of-Life Warnings
CO detectors do not last forever. The electrochemical sensor degrades over time and loses sensitivity. Most RV CO detectors have a service life of 5–10 years from manufacture date (check label or back of unit).
- Replace By Date — Printed on front or back — use that date.
- No Date — Assume 7 years from manufacture date (stamped on unit or code).
- End-of-Life Signal — Chirping every 30–60 seconds (not constant alarm) means sensor expired. Replace immediately — do not disable chirp.
Common chirp patterns:
- One chirp every 30–60 seconds: End-of-life — replace unit.
- Constant beeping: Actual CO detection — evacuate and ventilate.
- Three chirps + pause: Malfunction — replace.
Never remove batteries or disconnect to silence end-of-life chirp — it disables protection.
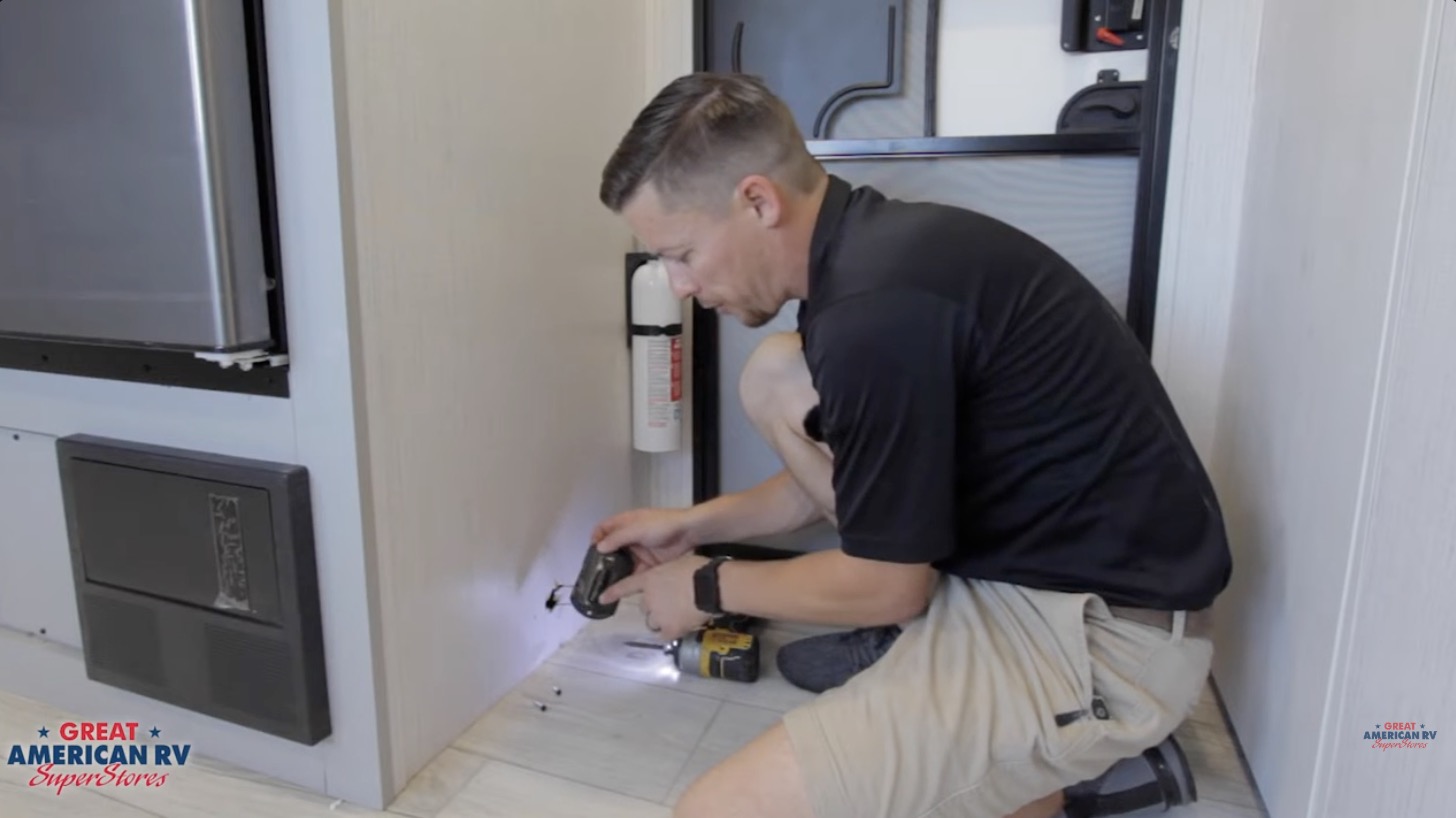
Replacing a CO Detector Step-by-Step
Replacement is simple on most RV units (hardwired 12V models):
- Turn off battery disconnect or remove house battery fuse.
- Remove old detector — usually two screws or twist-lock mount.
- Note wire colors (red positive, black ground; some have third wire).
- Disconnect wires (one at a time, label if unsure).
- Connect new detector — match wires (red to red, black to black).
- Mount new unit in same location.
- Restore power.
- Test — press Test button; alarm should sound.
Use exact replacement model (same brand/series) or compatible 12V hardwired unit (Kidde, First Alert, MTI Safe-T-Alert common).
What to Do If the Alarm Sounds (Real Emergency)
- Evacuate immediately — open doors/windows.
- Do not re-enter until ventilated and cleared.
- Turn off all propane appliances (furnace, water heater, stove).
- Check for obvious issues (blocked vents, exhaust leaks).
- Call emergency services if anyone shows symptoms.
- Have RV inspected by professional before reuse.
Common False Alarms and Causes
- Low batteries (if battery backup model) — replace 9V battery.
- Dust/insects in sensor — clean gently with compressed air.
- Cooking aerosols — use fan/vent.
- Nearby generator exhaust — relocate or ventilate.
- High humidity — rare but possible.
If frequent false alarms — replace detector.
Preventive Maintenance and Best Practices
- Test monthly — press Test button.
- Clean exterior vents — dust blocks sensor.
- Check expiration — replace at 7–10 years.
- Inspect wiring annually — no corrosion.
- Keep area clear — no sprays or cleaners near detector.
- Use RV-specific units — marine/home models may not meet RV vibration/temp specs.
Off-Grid Reliability and Battery Considerations
- Hardwired 12V — stays active as long as batteries have power.
- Parasitic draw minimal (~0.01–0.05A).
- In storage — disconnect batteries or use maintainer; detector still protects if wired directly.
- Lithium batteries — no issue; maintain charge.
Adding CO Detectors to Older RVs
If your older RV lacks detectors:
- Install hardwired 12V units (Kidde, MTI) — wire to 12V circuit.
- Place low on wall near sleeping areas and appliances.
- Interconnect if multiple — one alarm triggers all.
- Cost: $30–$80 per unit + install.
Expanded Frequently Asked Questions
How often test CO detector? Monthly or every trip — press Test button.
Why chirp every 30 seconds? End-of-life — replace detector.
Do CO detectors need batteries? Hardwired 12V units usually no; some have 9V backup — replace yearly.
Why low on wall? Early detection in breathing zone; standard for RVs.
Can I use home CO detector in RV? Not recommended — RV units built for vibration/temp extremes.
Alarm sounds — what to do? Evacuate, ventilate, turn off propane, call help if symptoms.
How long do detectors last? 5–10 years; check label or manufacture date.
Why false alarms in morning? Temperature/humidity changes or cooking vapors — ventilate.
Can I disable chirp temporarily? No — replace unit; disabling removes protection.
Best brand for RV? Kidde, First Alert, MTI Safe-T-Alert — RV-rated.
Do I need one near furnace? Yes — near sleeping areas and appliances.
Why interconnected detectors? One alarm triggers all — faster warning.
Can solar keep detectors on in storage? Yes — if batteries maintained.
The Bottom Line
CO detectors are small devices with a huge responsibility — protecting you from invisible, odorless carbon monoxide anytime propane appliances run. Test monthly, replace on schedule (7–10 years), keep powered (12V connected), and know what alarms mean. Regular checks and timely replacement ensure they work when needed most.
By following these steps:
- Test with button monthly.
- Replace at end-of-life chirp.
- Install low and near sleeping areas.
- Maintain 12V power.
You’ll camp safer and worry less.
Watch the Full Video Walkthrough See everything demonstrated step-by-step in our Understanding CO Detectors in Your RV video from the service team. Find it on the Great American RV SuperStores YouTube channel in the Hap’s Helpful Hacks playlist.
At Great American RV SuperStores, we don’t just sell RVs we help you understand how to use them. We’re making memories one weekend at a time. 🚐
*This content is not a legal standard or regulation, and does not create any new legal obligation. It is advisory in nature, informational in content, and is intended to assist and educate consumers in the use and enjoyment of their recreational vehicles. Great American RV SuperStores does not hereby make any warranty, express or implied, and does not assume any liability with respect to the use of, or damages resulting from the use of any information, method or process included in this content.
Recent Comments