Understanding Coleman RV Air Conditioner Systems: Operation, Maintenance, and Troubleshooting
Coleman rooftop air conditioners (now often branded under Airxcel, the parent company) are among the most common and dependable cooling systems installed in RVs today. Found in countless travel trailers, fifth wheels, toy haulers, Class C motorhomes, and even some Class A units, these units deliver reliable cooling when operated correctly and maintained properly. However, many owners encounter the same frustrations year after year: weak airflow, lukewarm vents, frequent freeze-ups, the unit cycling on and off too often, or complete failure to cool — all issues that usually stem from basic operation mistakes, neglected maintenance, restricted airflow, or unrealistic expectations rather than a catastrophic failure of the unit itself.
In 2026, Coleman/Airxcel rooftop ACs (typically 13,500–15,000 BTU single units, with dual setups in larger coaches) remain a staple due to their affordability, parts availability, and solid performance in moderate to hot climates. Newer models feature improved thermostats, quieter blowers, better humidity control, and compatibility with soft-start capacitors for easier generator and inverter use. This comprehensive guide covers everything you need to know about Coleman RV air conditioners: how the Airxcel thermostat and modes work, power requirements (120V AC and 12V DC), realistic cooling performance and temperature split expectations, step-by-step operation (fan-only, cool, heat pump or furnace if equipped), preventing and handling evaporator freeze-ups, rooftop shroud removal and condenser coil cleaning, return air filter care and replacement, optimizing airflow throughout the coach, electrical diagnostics including breaker and fuse checks, common error symptoms and detailed troubleshooting flowcharts, preventive maintenance schedules by season, preparation for hot-weather travel and boondocking, off-grid and inverter considerations, soft-start capacitor upgrades, high-efficiency model comparisons, and an expanded FAQ section drawn from real owner experiences and Great American RV SuperStores service bay feedback. With proper care, your Coleman AC can keep your RV comfortable for years without frequent or expensive repairs.
At Great American RV SuperStores, we service Coleman/Airxcel rooftop units almost daily during PDI inspections, seasonal tune-ups, and emergency calls. The most frequent complaints we hear are “it’s not blowing cold air,” “it freezes up constantly,” “the fan runs but the compressor won’t start,” or “it trips the breaker every time.” Nine times out of ten, these issues trace back to dirty or missing return air filters, blocked condenser coils, restricted airflow inside the coach, low voltage at the control board, poor 120V supply from the pedestal, or skipped annual maintenance. Once you understand how the entire system works — from the thermostat down to the rooftop coils — most of these problems become preventable or easy to diagnose yourself.
Hey Happy Campers! Todd here with Great American RV SuperStores.
Today we’re going in-depth on Coleman RV air conditioner systems — how the Airxcel thermostat and modes function, the dual power requirements (120V AC and 12V DC), realistic cooling performance and what a proper temperature split looks like, step-by-step operation (fan-only, cool, heat pump or furnace if equipped), preventing and handling evaporator freeze-ups, rooftop shroud removal and condenser coil cleaning, return air filter care and replacement, optimizing airflow throughout the coach, electrical diagnostics including breaker and fuse checks, common error symptoms and detailed troubleshooting flowcharts, preventive maintenance schedules by season, preparation for hot-weather travel and boondocking, off-grid and inverter considerations, soft-start capacitor upgrades for easier generator/inverter use, high-efficiency model comparisons for 2026, and answers to the questions we hear most often from owners.
If you’d prefer a step-by-step visual demo, check out the full walkthrough on the Great American RV SuperStores YouTube channel in our Hap’s Helpful Hacks playlist.
Let’s keep your RV cool and comfortable all summer long!
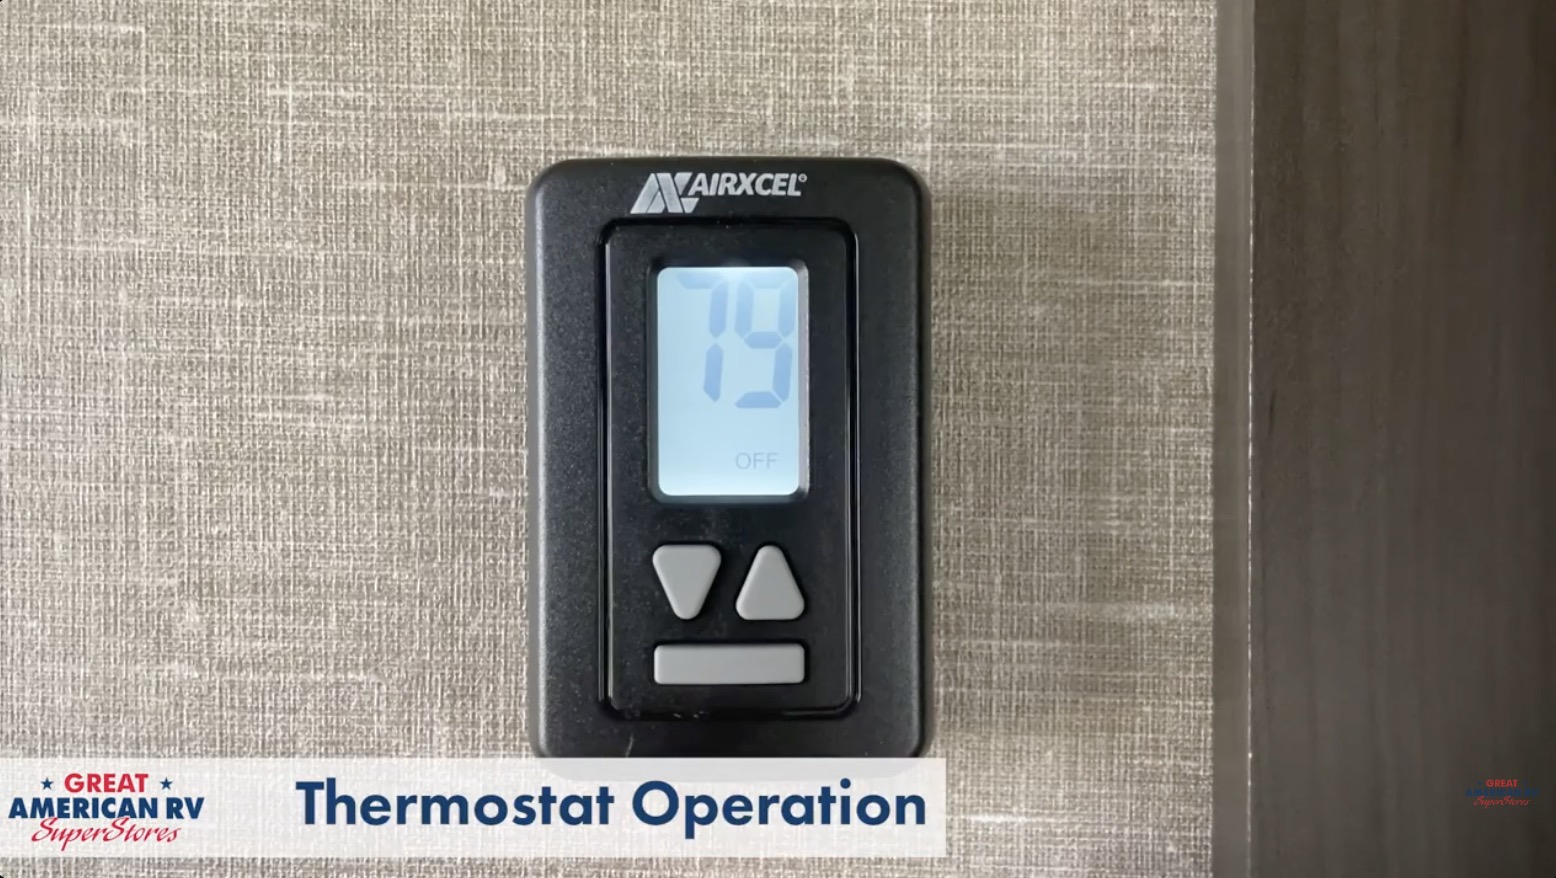
How the Airxcel Thermostat Works and Mode Functions
Coleman RV air conditioners use a dedicated Airxcel thermostat (usually wall-mounted near the main control center or entry area) to manage fan operation, cooling, and heating (if a heat pump or furnace integration is present). The thermostat serves as the brain of the system — it constantly reads the interior temperature via its built-in sensor, compares it to your desired setpoint, and sends commands to the rooftop unit to turn the compressor, condenser fan, and blower on or off as needed.
Typical control layout on 2025–2026 Airxcel thermostats:
- Main Power Button — turns the entire system on or off.
- Mode Button — cycles through available modes (Off → Fan Only → Cool → Furnace or Heat Pump if equipped).
- Fan Speed Selector — High, Low, or Auto.
- Temperature Up/Down Arrows — adjust the desired setpoint.
- Digital Display — shows current interior temperature, setpoint, active mode, fan status, and sometimes error codes or clock.
Detailed Mode Breakdown:
- Fan Only Mode The blower fan runs continuously at the selected speed (High or Low) but the compressor remains off. This circulates air throughout the RV, helps reduce humidity slightly by moving air across the (cold) evaporator coil even without active cooling, and prevents stale air buildup. Ideal for mild weather, nighttime ventilation, or when you want airflow without using additional power for cooling. Many owners leave the system in Fan Only overnight to keep air moving and reduce condensation inside.
- Cool Mode The compressor activates whenever the interior temperature rises above your setpoint. The snowflake icon appears on the display to indicate cooling is active. Fan operation can be set to:
- Auto — Fan cycles on/off with the compressor (saves power but can lead to freeze-ups in high humidity).
- High or Low Continuous — Fan runs constantly regardless of compressor state. In very hot or humid weather, Continuous High is strongly recommended — it keeps the evaporator coil dry between cooling cycles, improves dehumidification, and significantly reduces the risk of freeze-up.
- Furnace Mode (if thermostat is wired to furnace) Activates the RV’s propane furnace when interior temperature drops below setpoint. Operates like a standard home thermostat — furnace runs until setpoint is reached.
Fan behavior tip: In hot, humid conditions, always use Continuous High fan when in Cool mode. Auto fan saves a small amount of power but increases freeze-up risk because the coil can ice over when the compressor cycles off and airflow stops. Running the fan continuously on high during summer months is one of the best ways to prevent evaporator freeze-ups and maintain consistent cooling.
Power Requirements and Basic Diagnostics
GE rooftop air conditioners require both 120V AC and 12V DC to function correctly:
- 120V AC — Powers the compressor, condenser fan, and any electric heat strips. Supplied by shore power (30/50-amp pedestal), onboard generator, or an inverter (if equipped).
- 12V DC — Powers the thermostat, control board, relays, and reversing valve (heat pump models). Supplied by house batteries and maintained by the converter when on shore power or generator.
Basic Power Diagnostics (Start Here for Any Issue):
- Confirm 120V AC at pedestal — Plug in a known good appliance (microwave, hair dryer) or use multimeter (115–125V expected). Check campground breaker and pedestal GFCI.
- Check RV breaker panel — GE AC usually has a dedicated 20A double-pole breaker (sometimes labeled “AC” or “Air Conditioner”). Reset if tripped (flip fully off, then firmly on).
- Verify 12V DC at thermostat — Display should light up. If blank, check 12V fuse panel (often labeled “Thermostat,” “AC Control,” or “Furnace” — 3–5A fuse). Measure battery voltage: 12.6V+ resting, 13.5–14.4V charging.
- Test voltage at rooftop unit — If possible, confirm 115–125V AC at unit input.
If thermostat powers on but no cooling occurs:
- Compressor breaker tripped in panel.
- Low refrigerant (leak) — requires professional service.
- Bad start/run capacitor — common failure on older units (buzzing or humming sound).
- Faulty thermostat wiring or control board.
Realistic Cooling Expectations and Performance Metrics
GE rooftop units (typically 13,500–15,000 BTU) deliver strong cooling but have real-world limitations:
- Temperature split: 18–22°F (supply air from vents should be 18–22°F cooler than return air at ceiling register).
- Initial performance in hot RV: First air from vents may feel only slightly cool — normal until interior temperature drops.
- Full cooldown time: 1–3 hours from 90°F+ interior to comfortable 75°F, depending on RV size, insulation, and ambient heat.
- Single unit effective area: 200–400 sq ft in moderate heat (up to 95°F outside).
- Dual units: Required for larger rigs (>35 ft) or extreme heat (>100°F).
- High humidity impact: Cooling feels less effective above 60% humidity — dehumidification improves comfort more than raw temperature drop.
Factors that improve performance:
- Close all window shades/blinds — blocks solar heat gain.
- Minimize door openings — hot air infiltration kills efficiency.
- Start AC early — even before RV feels hot — to stay ahead of heat buildup.
- Run fan on Continuous High — better air circulation and dehumidification.
Preventing and Handling Evaporator Freeze-Ups
Freeze-up (ice forming on the indoor evaporator coil) is one of the most frequent complaints with GE units:
- Primary causes: Restricted airflow (dirty or missing return air filters), high humidity, frequent door openings near the AC vent, low refrigerant charge (leak), fan cycling off too often, or running on low fan speed in humid conditions.
- Symptoms: Warm or lukewarm air from vents, reduced cooling output, hissing or gurgling sounds, visible ice on underside of ceiling vents or registers, frost on suction line (if accessible).
Prevention strategies:
- Run fan in Continuous High mode during hot/humid weather — constant airflow keeps evaporator coil dry between compressor cycles.
- Clean or replace return air filters monthly — clogged filters are the #1 cause of freeze-ups.
- Ensure all ceiling vents/registers are fully open and unobstructed — no furniture, curtains, or bedding blocking airflow.
- Seal air leaks — check window gaskets, door seals, vent openings.
- Start AC early in the day — prevents extreme humidity and temperature buildup inside.
- Avoid frequent door openings — use screen door or limit entry/exit.
If freeze-up occurs:
- Immediately turn off Cool mode — switch to Fan Only (high speed) or Off.
- Allow fan to run continuously to melt ice — typically 20–60 minutes (longer if severe).
- Water dripping from vents is normal during defrost — place towels or a catch pan below if needed.
- Once defrosted (no more ice, cool air returns), resume Cool mode.
- Monitor closely — if freeze-up recurs quickly, clean filters/coils, check for refrigerant leak (professional service), or improve airflow.
Rooftop Maintenance and Condenser Coil Cleaning
The rooftop unit (condenser) must release heat efficiently to cool effectively. Annual maintenance is essential:
- Turn off AC breaker in panel — prevent accidental startup.
- Remove shroud — usually 4–6 screws around perimeter.
- Inspect condenser coils (outer finned area) — look for dirt, leaves, cottonwood fluff, bugs, or debris.
- Apply AC coil cleaner spray (non-acidic, RV-safe) — let sit 5–10 minutes to break down buildup.
- Rinse gently with garden hose — low pressure only (high pressure bends delicate fins).
- Straighten bent fins with fin comb tool — restores airflow.
- Clean condenser fan blades — remove debris with brush or compressed air.
- Check shroud gasket/seal — replace if cracked or missing.
- Tighten mounting bolts (8–10 total) — ensures gasket seals against roof to prevent leaks.
- Reassemble shroud and test system.
Dirty condenser coils reduce cooling efficiency by 20–40% and increase amp draw — annual cleaning is one of the highest-impact maintenance tasks.
Return Air Filters and Interior Airflow Optimization
- Return air filters — Located at ceiling register/grille or behind removable panel. Clean or replace monthly during heavy use.
- Check all ceiling vents/registers — Ensure fully open; no furniture, curtains, or bedding blocking.
- Seal air leaks — Window gaskets, door seals, vent openings — use weatherstripping or foam tape.
- Shade windows — Reflective shades or curtains block solar heat gain (biggest cooling load).
- Minimize door openings — Use screen door or limit entry/exit during peak heat.
Electrical Diagnostics and Breaker/Fuse Checks
GE ACs draw 12–18A running on high:
- Dedicated 20A double-pole breaker in main panel — labeled “AC,” “Air Conditioner,” or similar. Reset if tripped.
- Soft-start capacitors (aftermarket add-on) reduce startup surge by 50–70%, making generator/inverter operation easier.
- 12V control power — Thermostat/control board needs 12V. If thermostat blank, check 12V fuse panel (often “Thermostat” or “AC Control” — 3–5A fuse).
- Test voltage at rooftop unit — 115–125V AC expected when running.
Common Issues and Troubleshooting Flowchart
No power to unit:
- Shore pedestal breaker tripped? Test with other appliance.
- RV main breaker tripped? Reset.
- 12V fuse blown at thermostat? Replace.
Fan runs but no cooling:
- Compressor breaker tripped? Reset.
- Low refrigerant (leak) — professional service.
- Bad start/run capacitor — buzzing/humming sound; replace.
Freeze-up frequent:
- Dirty/missing return filter — clean/replace monthly.
- Restricted vents — open all registers.
- High humidity — run Continuous High fan.
Uneven cooling:
- Blocked vents — clear obstructions.
- Low refrigerant — service needed.
- Poor insulation — seal leaks.
Noisy operation:
- Fan blade hitting debris — clean shroud.
- Loose shroud — tighten bolts.
- Failing motor — replace unit.
Preventive Maintenance Schedules
Monthly (during use):
- Clean/replace return air filters.
- Check all vents/registers unobstructed.
- Test thermostat operation (fan, cool cycle).
- Listen for unusual noises.
Annually (spring or before summer):
- Rooftop shroud removal and condenser coil cleaning.
- Shroud gasket inspection/replacement.
- Mounting bolt torque check (prevents leaks).
- Electrical connections tight (at unit and panel).
- Soft-start capacitor check (if installed).
Before hot-weather travel:
- Pre-cool RV on shore power.
- Run fan high to test airflow.
- Verify voltage at pedestal.
Off-Grid and Inverter Considerations
- Single 13,500 BTU unit draws 12–15A running — 2000W+ inverter minimum.
- Startup surge 30–50A — soft-start capacitor reduces to ~20A.
- Solar/lithium needed for extended off-grid cooling (600W+ panels, 600Ah+ lithium).
- Run fan only on inverter to save power; reserve cooling for peak heat hours.
Upgrade Considerations for 2026
Newer GE/RecPro high-efficiency units offer better SEER ratings, lower amp draw, quieter operation. Soft-start kits (Micro-Air EasyStart) reduce generator/inverter strain by 50–70%. Some owners upgrade to dual units for larger coaches or extreme heat.
Expanded Frequently Asked Questions
How cold should vents blow? 18–22°F cooler than return air — measure with thermometer.
Why no cooling in extreme heat (>100°F)? Ambient limits efficiency — shade RV, start early, run fan high.
Freeze-up every trip — what’s wrong? Dirty/missing return filter #1 cause — clean/replace monthly.
Can I run AC on inverter? Yes — 2000W+ pure sine wave; soft-start capacitor essential.
How often clean rooftop coils? Annually — more in dusty or cottonwood-heavy areas.
Breaker trips on startup? High surge — add soft-start capacitor.
Why fan only works, no cooling? Compressor breaker tripped or low refrigerant — reset breaker first.
Best thermostat upgrade? Honeywell, Emerson, or newer GE digital — better control accuracy.
How much power does 15,000 BTU draw? 12–18A running; 30–50A surge without soft-start.
Safe to run overnight on generator? Yes — monitor fuel and CO; use CO detectors.
Why AC smells musty on first use? Mold/mildew in evaporator — run fan only for 30 min to dry.
Can I add a second AC unit? Yes — requires 50-amp service, additional breaker, and wiring.
The Bottom Line
GE RV air conditioners are reliable systems when properly maintained and operated with realistic expectations. Regular filter cleaning, rooftop coil maintenance, continuous high fan use in humidity, early startup during hot days, and voltage/breaker checks all play a critical role in keeping your RV comfortable. Prevent freeze-ups with good airflow and maintenance, troubleshoot with power checks first, and consider soft-start upgrades for generator/inverter use.
By following these steps:
- Start AC early and use Continuous High fan in heat/humidity.
- Clean filters monthly and coils annually.
- Check 120V and 12V power before assuming failure.
- Shade windows and seal leaks to reduce load.
You’ll stay cool, avoid most common failures, and enjoy every trip — no matter how hot it gets.
Watch the Full Video Walkthrough See everything demonstrated step-by-step in our Understanding GE RV Air Conditioner Systems video from the service team. Find it on the Great American RV SuperStores YouTube channel in the Hap’s Helpful Hacks playlist.
At Great American RV SuperStores, we don’t just sell RVs we help you understand how to use them. We’re making memories one weekend at a time. 🚐
*This content is not a legal standard or regulation, and does not create any new legal obligation. It is advisory in nature, informational in content, and is intended to assist and educate consumers in the use and enjoyment of their recreational vehicles. Great American RV SuperStores does not hereby make any warranty, express or implied, and does not assume any liability with respect to the use of, or damages resulting from the use of any information, method or process included in this content.
Recent Comments