How to Set the Zero (Null) Point on Your LCI Electronic or Hydraulic Leveling System
If your LCI leveling system suddenly starts leaning your RV in the wrong direction, throwing the coach noticeably off-level, or behaving inconsistently (auto-level stops short, one side stays high, or the display shows erratic degrees), your zero point (also called null point or reference point) has likely been lost. The zero point is the stored “perfect level” reference the system uses as its target for every auto-level cycle. When it’s off, the system no longer knows what true level looks like, so it can’t reliably level the RV — even on flat ground.
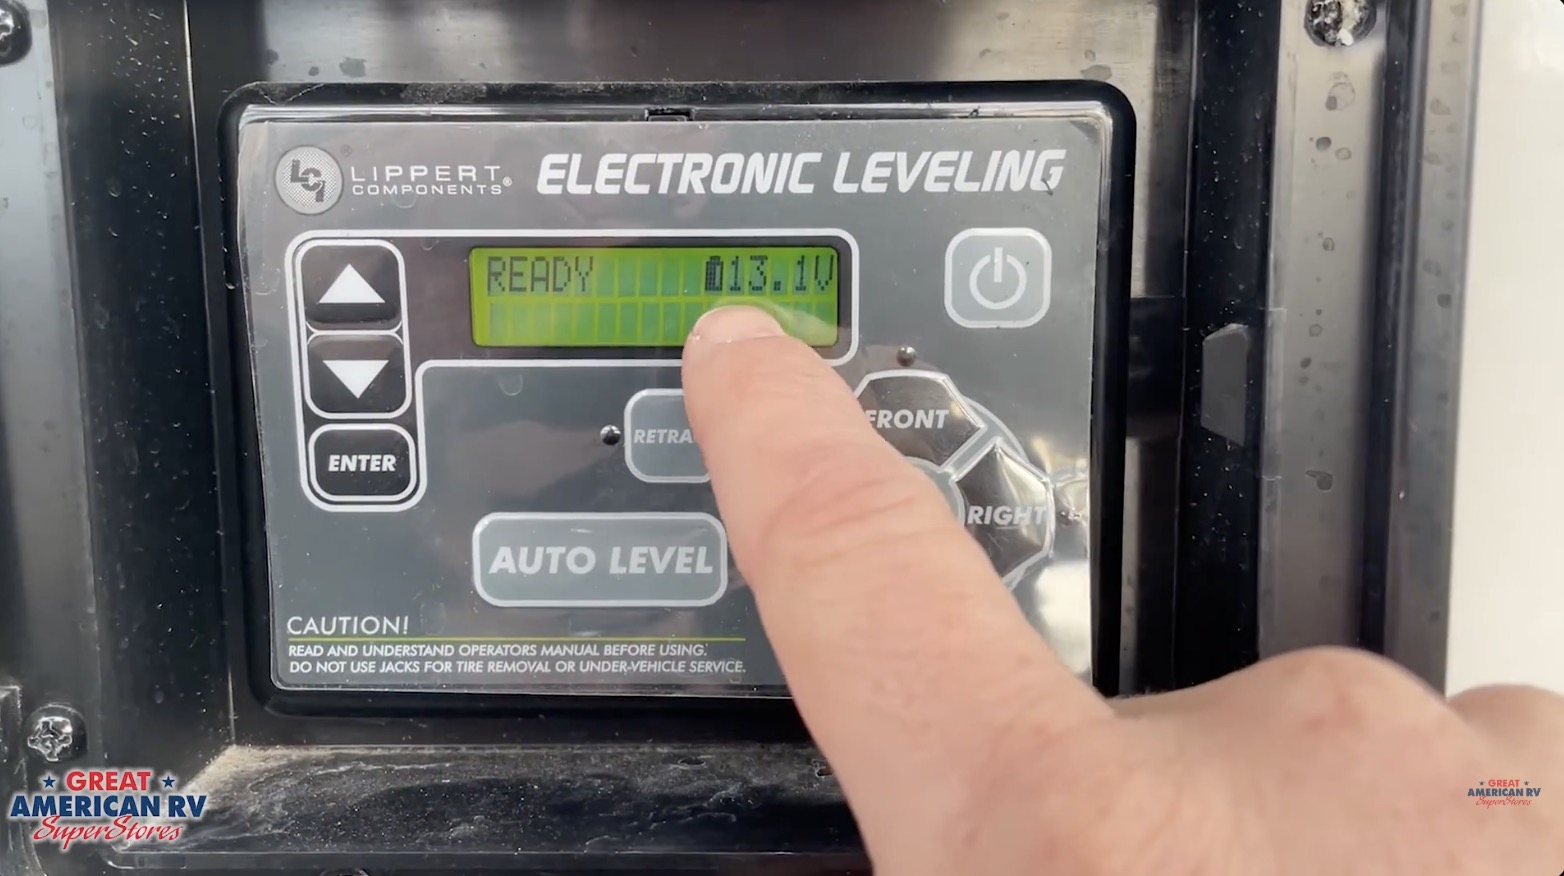
This guide applies to any RV equipped with the classic rectangular LCI leveling keypad (electronic or hydraulic versions), including travel trailers, fifth wheels, Class A motorhomes, Class C motorhomes, and toy haulers from brands like Forest River, Keystone, Jayco, Grand Design, Heartland, and many others. If your control panel matches the familiar rectangular LED layout with Power, Auto Level, All Retract, Manual, Front/Rear, and directional arrow buttons, this is the exact process to follow.
Resetting the zero point is one of the most powerful DIY fixes for LCI systems. It takes 10–20 minutes, requires only a good 4-foot level and strong battery voltage, and often resolves 80–90% of “my auto-level is off” complaints without a service call. In this detailed guide, we’ll cover why the zero point gets lost, when you should (and shouldn’t) reset it, the full step-by-step manual leveling and calibration process, how to test the new zero point, common mistakes that cause persistent issues, preventive tips to keep the zero stable, electrical and sensor troubleshooting, maintenance best practices, safety considerations, and an expanded FAQ section based on real 2026 owner experiences and service bay feedback.
At Great American RV SuperStores, we perform zero point resets almost daily during deliveries, PDI checks, and customer visits. We’ve seen the same handful of errors repeatedly: low voltage during calibration, movement inside the RV while setting manual level, skipping the test cycle, or failing to verify with a physical level. Follow these steps precisely, and your system will return to factory-like accuracy.
Hey Happy Campers! Todd here with Great American RV SuperStores.
Today we’re going in-depth on how to set (or reset) the zero/null point on your LCI Electronic or Hydraulic Leveling System — including why it drifts, when to recalibrate, the exact manual leveling sequence, entering calibration mode, testing the new zero point, avoiding common pitfalls, electrical/sensor checks if recalibration doesn’t hold, preventive maintenance to keep it stable, and answers to the questions we hear most often from owners.
If you’d prefer a step-by-step visual demo, check out the full walkthrough on the Great American RV YouTube channel in our Hap’s Helpful Hacks playlist.
Let’s get your RV perfectly level again!
Why the Zero Point Gets Lost and When to Reset It
The zero point is a digital reference value stored in the control module. It tells the system “this is what level looks like” based on the internal pitch/roll sensor’s reading at that moment. Once set, auto-level always targets that same reference.
Common reasons it drifts or gets lost:
- Low battery voltage during a leveling cycle — power dips below ~10.5–11V, corrupting the stored value.
- Power interruptions — dead battery, blown fuse, or disconnect switch flipped during operation.
- Sensor disturbance — loose mounting, corrosion, or vibration damage to the rear-mounted level sensor (underbelly).
- Control board replacement or service — new board starts with factory zero, not your RV’s custom level.
- Extreme temperature swings or long storage — sensor electronics can shift slightly over time.
- User error during prior calibration — moving inside the RV, opening slides, or not using a physical level.
When you SHOULD reset the zero point:
- Auto-level consistently leaves the RV noticeably nose-high, nose-low, or leaning to one side.
- One corner stays higher/lower than others after auto cycle.
- “Excessive Slope” or “Out of Stroke” errors appear even on reasonably level sites.
- After replacing batteries, control board, or leveling sensor.
- The RV feels off-level inside even when auto says it’s done.
When you should NOT reset the zero point:
- Minor interior adjustments (door swing, countertop feel) — use manual mode only.
- Every trip — if recalibrating frequently, there’s an underlying issue (low voltage, bad sensor, loose wiring).
- On uneven ground — always manually level first on a known flat surface.
Tools and Preparation You’ll Need
- 4-foot level (essential — bubble levels on RV are often inaccurate).
- Strong 12V power — fully charged batteries or shore power (12.6V+ resting, 13.5–14.4V charging).
- Multimeter (optional but helpful for voltage checks).
- Flashlight for underbelly sensor inspection (if needed later).
- Park on a known flat surface — concrete pad, level driveway, or parking lot.
STEP 1: Manually Level the RV (The Most Critical Step)
The system will memorize whatever position it is in when you set the zero point, so you must get the RV perfectly level first.
- Turn the leveling system ON — press Power button.
- Make sure voltage is good — check battery gauge or measure at batteries.
- Enter MANUAL MODE — press Manual Level → Enter.
- Extend ALL jacks — if only front deployed, press and hold REAR until rear jacks drop (1–2 inches minimum).
- Place 4-foot level inside the RV at the center point (near fridge or dinette floor — avoid carpeted or uneven areas).
- Check front-to-back first — adjust FRONT or REAR buttons until bubble centered.
- Check left-to-right — adjust LEFT or RIGHT buttons until bubble centered.
- Recheck both directions — small adjustments can affect the other axis.
- Ignore the keypad degree display during this step — until zero point is set, those numbers are meaningless.
Once the physical level shows perfect bubble in both directions, the RV is ready for calibration.
STEP 2: Enter Zero Point Calibration Mode
- Exit Manual Mode — return to home screen.
- Turn the system OFF — press Power button.
- Press the FRONT button 10 times quickly.
- Press the REAR button 10 times quickly.
- You’ll see “Zero Point Calibration” or similar on the display.
- Press ENTER to confirm.
- The system verifies the current position.
- When the panel shuts itself off (or beeps), calibration is complete.
STEP 3: Test the New Zero Point
- Fully retract all jacks (hold All Retract).
- Press AUTO LEVEL.
- Watch the cycle — the RV should return to the exact bubble level you manually set.
- Verify inside with the 4-ft level — bubble should center again.
If it does, your zero point is correctly set. If not, repeat the process carefully — double-check manual leveling and ensure no movement during the cycle.
Common Mistakes That Cause Persistent Issues
- Moving inside or opening slides while setting manual level — shifts weight, corrupts reference.
- Using only the keypad degree display (not a physical level) — keypad can be off until recalibrated.
- Low voltage during calibration — dips below 11V corrupt the stored value.
- Skipping the 10 presses sequence — wrong button order or too slow fails to enter mode.
- Not retracting fully before testing — residual pressure affects results.
- Failing to re-test with Auto Level — many owners assume it’s done after the beep.
Electrical and Sensor Troubleshooting If Recalibration Doesn’t Hold
If you recalibrate repeatedly and level still drifts:
- Low Voltage Events — Check converter output (13.5–14.4V on shore power), clean battery terminals, test battery health.
- Rear Sensor Issues — Most LCI systems mount the level sensor under the rear frame. Inspect for loose mounting, corrosion, or damage. Clean connections; reseat if possible.
- Ground Problems — Loose or corroded grounds at control module or battery cause intermittent faults.
- Control Board Failure — Rare but possible after power surges — service replacement needed.
- Wiring Faults — Check harnesses for chafing or pin damage.
Quick test: Measure voltage at the control module connector (should match battery voltage).
Preventive Tips to Keep Zero Point Stable
- Maintain strong battery voltage — use maintainer in storage, avoid deep discharge.
- Keep battery connections clean and tight.
- Recalibrate only when truly needed — not every trip.
- Level on stable surfaces — avoid soft ground that compresses under jacks.
- Inspect sensor mounting annually — ensure secure and free of debris.
- Update firmware if available (via Lippert app or dealer).
Expanded Frequently Asked Questions
How often should I recalibrate? Only when leveling is noticeably off or after power/battery work. Healthy systems hold zero for years.
Can I use the keypad degrees instead of a physical level? No — keypad degrees are relative until zero is set. Always use a 4-ft level for accuracy.
Why does auto-level stop with “Excessive Slope” on flat ground? Lost zero point — recalibrate. Or low voltage interrupted cycle.
What if jacks won’t extend/retract after reset? Check voltage, fuses, park brake/ignition interlock. Reset system power.
Do I recalibrate after changing batteries? Yes — power loss can wipe zero point.
How to tell if rear sensor is bad? Persistent drift after multiple recalibrations; level reads wrong even on known flat surface.
Can I recalibrate with slides out? No — weight shift affects accuracy. Retract first.
What if I enter calibration mode by mistake? Power off and start over — no harm done.
Is there a difference between electronic and hydraulic LCI? Process is identical for rectangular keypads — hydraulic just uses fluid power.
How to prevent low voltage during calibration? Plug into shore power or run generator; ensure batteries are charged.
The Bottom Line
Resetting the zero/null point on your LCI leveling system is a straightforward DIY fix that restores accurate auto-leveling in most cases. Manually level the RV perfectly with a 4-ft level, enter calibration mode with the 10-press sequence, test with auto level, and maintain strong voltage to keep it stable. If recalibration doesn’t hold, check batteries, connections, and the rear sensor before calling service.
By following these steps precisely:
- Manually level first with a physical level.
- Use the correct button sequence.
- Test after calibration.
- Prevent low-voltage events.
Your LCI system will level reliably trip after trip.
Watch the Full Video Walkthrough See everything demonstrated step-by-step in our How to Set the Zero Point on Your LCI Leveling System video from the service team. Find it on the Great American RV SuperStores YouTube channel in the Hap’s Helpful Hacks playlist.
At Great American RV SuperStores, we don’t just sell RVs we help you understand how to use them. We’re making memories one weekend at a time. 🚐
*This content is not a legal standard or regulation, and does not create any new legal obligation. It is advisory in nature, informational in content, and is intended to assist and educate consumers in the use and enjoyment of their recreational vehicles. Great American RV SuperStores does not hereby make any warranty, express or implied, and does not assume any liability with respect to the use of, or damages resulting from the use of any information, method or process included in this content.
Recent Comments